On this page...
Course Rostering
If you are applying with an Iowa DIAL-approved course, your training provider must link your account to the class session before you apply.
You must create an account before your course provider can upload your training course. Provide your People ID Number (PIN) to your course provider so that they can locate your account. Your PIN is viewable from the My Profile page.
If you have completed a class, you may want to verify with your training provider that they have linked your account to the class session before proceeding. Applicants applying with an Iowa DIAL-approved course are not processed until their course is electronically linked.
Back to top
Backflow Registration Instructions for New Applicants
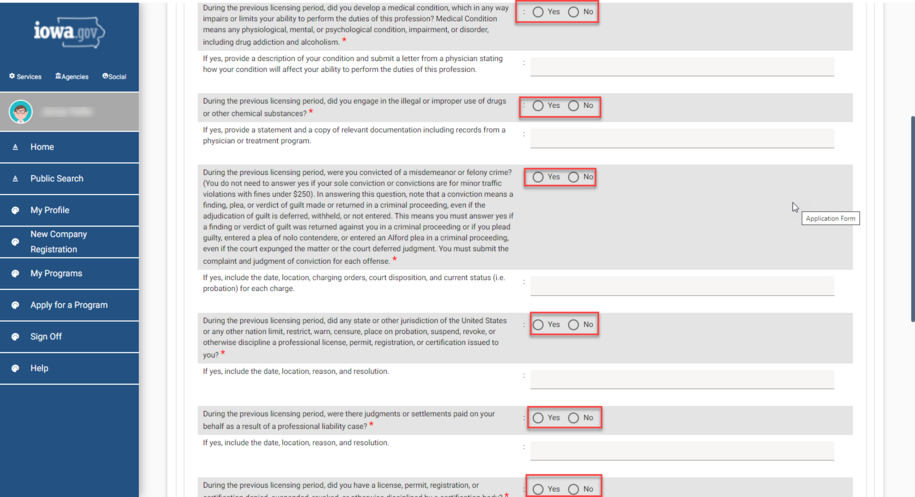
New Application | Login and Apply
- Sign in to the online licensing system with your existing account information.
- REMINDER: These instructions are applying for an individual license. Do not set up a business account to apply.
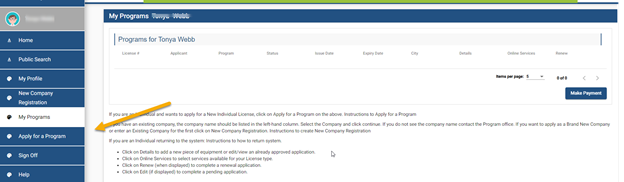
- Verify you do not already have an in-progress application by clicking My Programs to view existing licenses. If there is an existing backflow application, click Edit to resume.
Click Apply for a Program if you do not have an in-progress application.
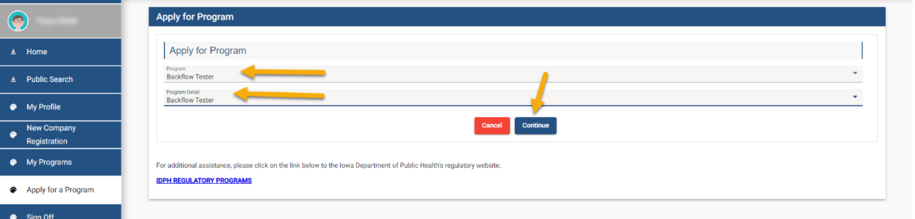
On the Apply for Program screen, use the drop-down menus to select Backflow Tester in both dropdown boxes. Click Continue. If a popup appears, click OK.
New Application | Affirmation
Answer all six Yes/No questions.

- Provide a brief description in the provided text box for any Yes answers. You will upload your documentation regarding your Yes answers in the Attachment section.
- The department may require the applicant to submit supplementary statements or documents containing additional information to enable to department to determine whether an application should be approved or denied, or whether a previously issued certification should be amended, suspended, or revoked.
- The department may require the applicant to submit supplementary statements or documents containing additional information to enable to department to determine whether an application should be approved or denied, or whether a previously issued certification should be amended, suspended, or revoked.
New Application | Third Party or Out of State Credentials
- One of these sections must be completed if you did not take an Iowa approved training course and are applying with third party (ABPA, ASSE) or out-of-state (NE. Grade VI) credentials.
Answer the three Yes/No questions under Third Party Certification and Back Flow Tester Out of State Credentials or Training
- If you took an Iowa-approved course, answer No to all three questions.
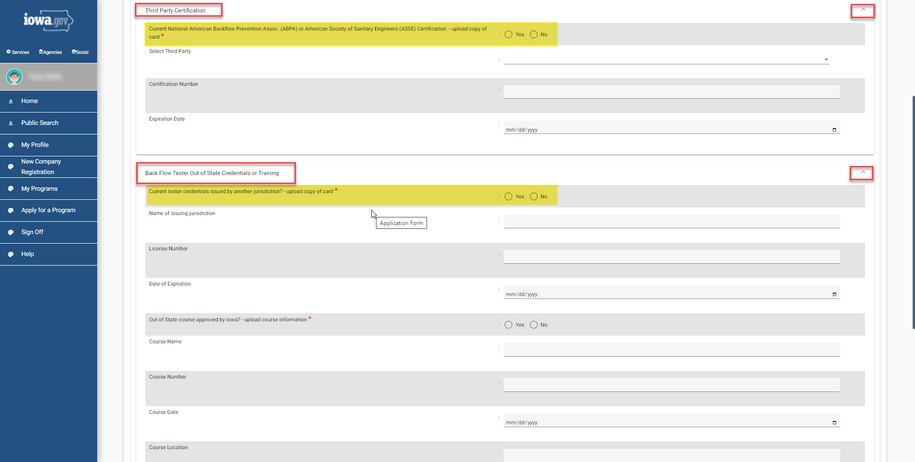
- If you answer Yes, enter the Certification Number and Expiration Date. You must upload a copy of your certification in the Attachments section.
New Application | Attachments
- You do not need to attach your Iowa-approved 32-hour course. Your training provider is responsible for uploading your course.
- Do not click Cancel. Doing so will void the application and require you to contact program staff to proceed.
- Click Add New attachment
- Use the dropdown to select the Type. If nothing applies, choose Word Merge
- Enter a brief description for the document.
- Click Choose File to open an explorer/finder window to locate and select your document.
- Click Upload Attachments.
After all attachments are uploaded, click Continue. Click OK on the popup.
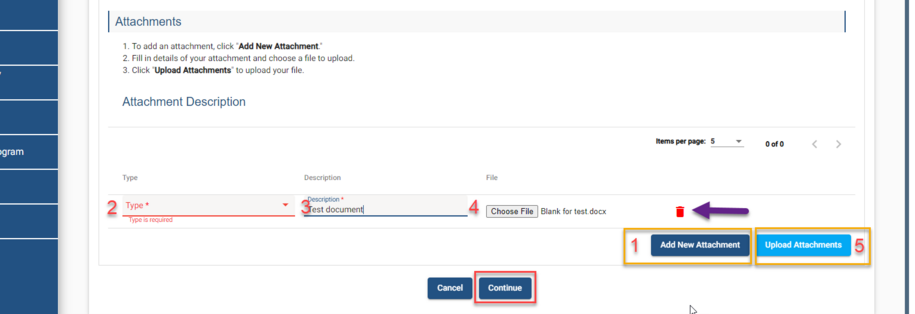
- If you upload the wrong document, click the red trash can icon to remove it.
After you click Upload Attachments, you cannot remove the attachments. - You must attach all supporting documentation before paying the registration fee or your application will be delayed or denied.
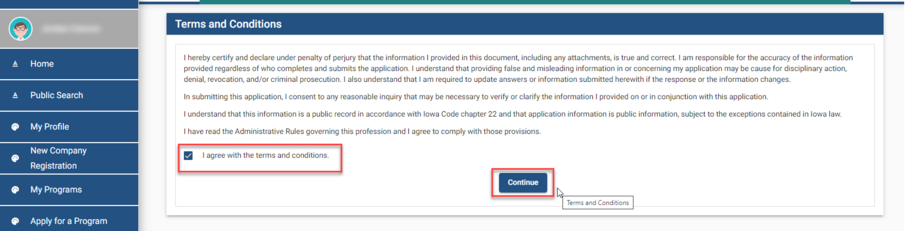
Public Portal Terms & Conditions
- Read the Terms & Conditions. Check the I agree with the terms and conditions checkbox.
Click Continue.
Resolving Error(s)
If there is an error when clicking Continue, it could be for the following reasons:
- You do not have a valid course rostered to your account. Contact your course provider to verify that your course is uploaded.
- The application is incomplete - a required question is not answered or a required field is not populated.
- Go to the My Programs page
- Click the Edit button that is in the same row as your in-progress backflow application
- Complete all of the required fields (indicated by the red "*").
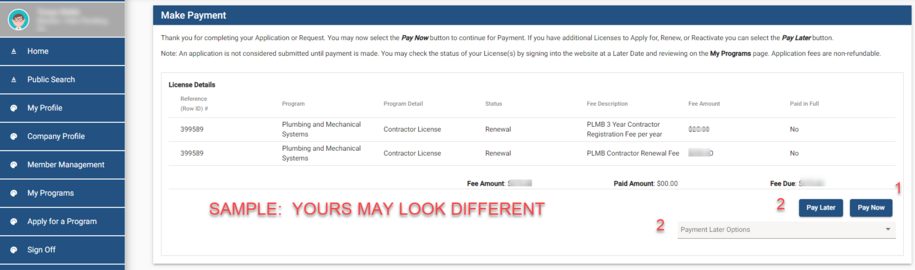
Make a Payment
- Applications are incomplete until paid in full
- You can pay immediately or mail a check
Option 1 - Pay Online
Click Pay Now. Click OK on the pop-up box. You will be taken to the online banking system.
- Please review the payor information. This section automatically populates from your My Profile page.
- Scroll down and select your payment method
- Enter your payment details and click Continue.
- Click Confirm
You will receive an email confirmation of your payment.
Option 2 - Pay Later
- This is used to pay at a later date or pay with a mailed-in check or money order.
- Use the Pay Later Options dropdown to select your pay later option.
- You will be taken to the Programs page.
- Click on Details.
- Scroll down to Print Bill.
- This must be included with a mailed-in check or money order.
Processing
Refer to the backflow program page for details regarding the processing schedule.
Back to top
Backflow Registration Renewal Instructions
Renewal Application | Login and Renew
- Sign in to the online licensing system with your existing account information.
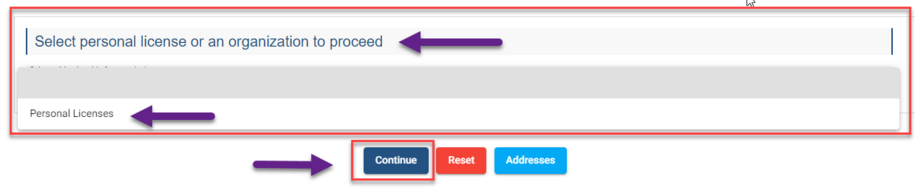
From the My Profile page, use the "Select personal license or an Organization to proceed" dropdown to select Personal Licenses. Click Continue
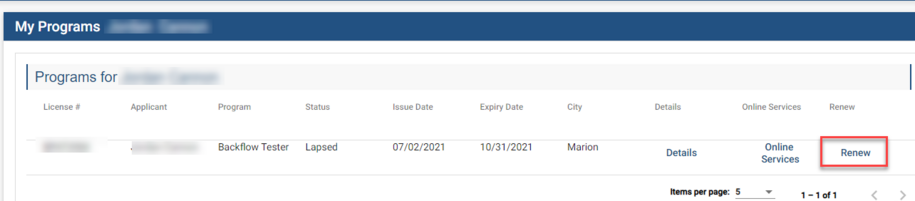
Click the Renew button that is in the row of your backflow tester registration.
Renewal Application | Affirmation
Answer all six Yes/No questions
- Provide a brief description in the provided text box for any Yes answers. You will upload your documentation regarding your Yes answers in the Attachment section.
The department may require the applicant to submit supplementary statements or documents containing additional information to enable to department to determine whether an application should be approved or denied, or whether a previously issued certification should be amended, suspended, or revoked.
Renewal Application | Third Party or Out of State Credentials
- One of these sections must be completed if you did not take an Iowa approved training course and are applying with third party (ABPA, ASSE) or out-of-state (NE. Grade VI) credentials.
Answer the three Yes/No questions under Third Party Certification and Back Flow Tester Out of State Credentials or Training. If you took an Iowa-approved course, answer No to all three questions.
- If you answer Yes, enter the Certification Number and Expiration Date. You must upload a copy of your certification in the Attachments section.
Renewal Application | Attachments
- You do not need to attach your Iowa-approved five-hour CEU or 32-hour initial course. Your training provider is responsible for uploading your course.
- Do not click Cancel. Doing so will void the application and require you to contact program staff to proceed.
- Click Add New attachment
- Use the dropdown to select the Type. If nothing applies, choose Word Merge
- Enter a brief description for the document.
- Click Choose File to open an explorer/finder window to locate and select your document.
- Click Upload Attachments.
After all attachments are uploaded, click Continue. Click OK on the popup.
- If you upload the wrong document, click the red trash can icon to remove it.
After you click Upload Attachments, you cannot remove the attachments. - You must attach all supporting documentation before paying the registration fee or your application will be delayed or denied.
Public Portal Terms & Conditions
- Read the Terms & Conditions. Check the I agree with the terms and conditions checkbox.
Click Continue.
Resolving Error(s)
If there is an error when clicking Continue, it could be for the following reasons:
- You do not have a valid course rostered to your account. Contact your course provider to verify that your course is uploaded.
- The application is incomplete - a required question is not answered or a required field is not populated.
- Go to the My Programs page
- Click the Edit button that is in the same row as your in-progress backflow application
- Complete all of the required fields (indicated by the red "*").
Make a Payment
- Applications are incomplete until paid in full
- You can pay immediately or mail a check
Option 1 - Pay Online
Click Pay Now. Click OK on the pop-up box. You will be taken to the online banking system.
- Please review the payor information. This section automatically populates from your My Profile page.
- Scroll down and select your payment method
- Enter your payment details and click Continue.
- Click Confirm
You will receive an email confirmation of your payment.
Option 2 - Pay Later
- This is used to pay at a later date or pay with a mailed-in check or money order.
- Use the Pay Later Options dropdown to select your pay later option.
- You will be taken to the Programs page.
- Click on Details.
- Scroll down to Print Bill.
- This must be included with a mailed-in check or money order.
Processing
Refer to the backflow program page for details regarding the processing schedule.
Back to top