These instructions assume you have already created an A&A account. To create an account, go to the online licensing portal and click New User Registration.
The online licensing portal displays best on a desktop or laptop computer.
For application support, contact 855.824.4357.
For login or password reset support, visit the Enterprise A&A Account guidance page or contact the help desk at 800.532.1174 or adperehreg@idph.iowa.gov
For general questions about the tattoo program, contact env.health@dia.iowa.gov.
1
Login and Register the Establishment
- Sign in to the online system
- Click New Company Registration to create a new tattoo establishment in the licensing system.
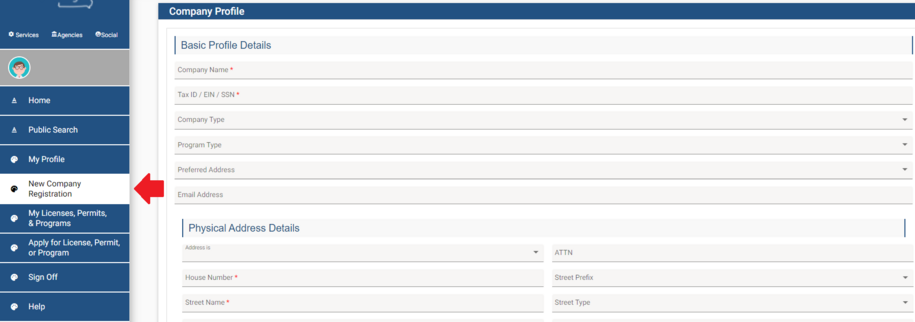
- Enter the establishment information in the required Company Profile fields:
- Complete the basic profile details and physical address details for the company.
- Enter the company name without any extra periods or special characters (apostrophes are okay).
- For company type, firm/entity.
- Under Address select “Work.”
- Enter remaining address details. Fields with a red * are required.
- Unit Type has options for entering: PO BOX, APT, Unit, or Suite.
- At least one phone number is required.
- Click Continue
- Name or physical address changes for a company can only be submitted by emailing env.health@dia.iowa.gov.
2
Apply for the Establishment Permit
- Navigate to the My Profile page in the left menu.
- Use the "Select your facility name, organization name, or personal license" dropdown to select your tattoo establishment. Click Continue. You will be taken to the program page for that establishment.
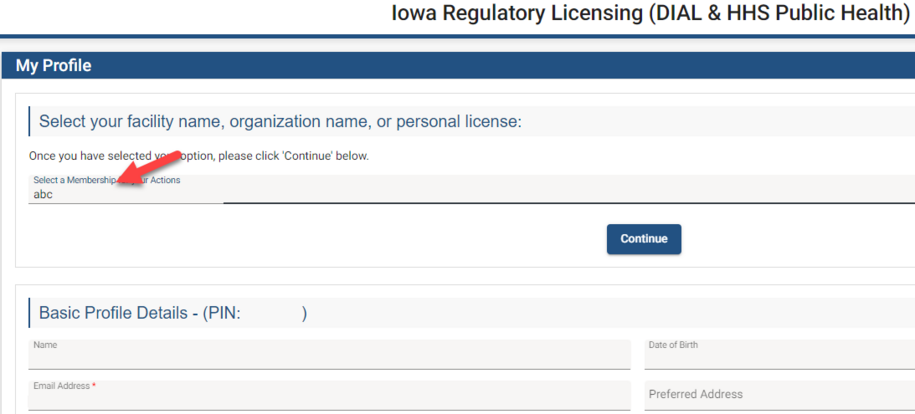
- Click Apply for License, Permit, or Program in the left menu.
- Select Program: Tattoo Facility, Program Detail Permanent Establishment

- Click Continue and then OK on the popup.
3
Application Form Questions
- Answer the questions under Affirmation.
- You must type a description under any answer you answer Yes to. Attach supplemental documentation about the Yes answer under the Attachment section.
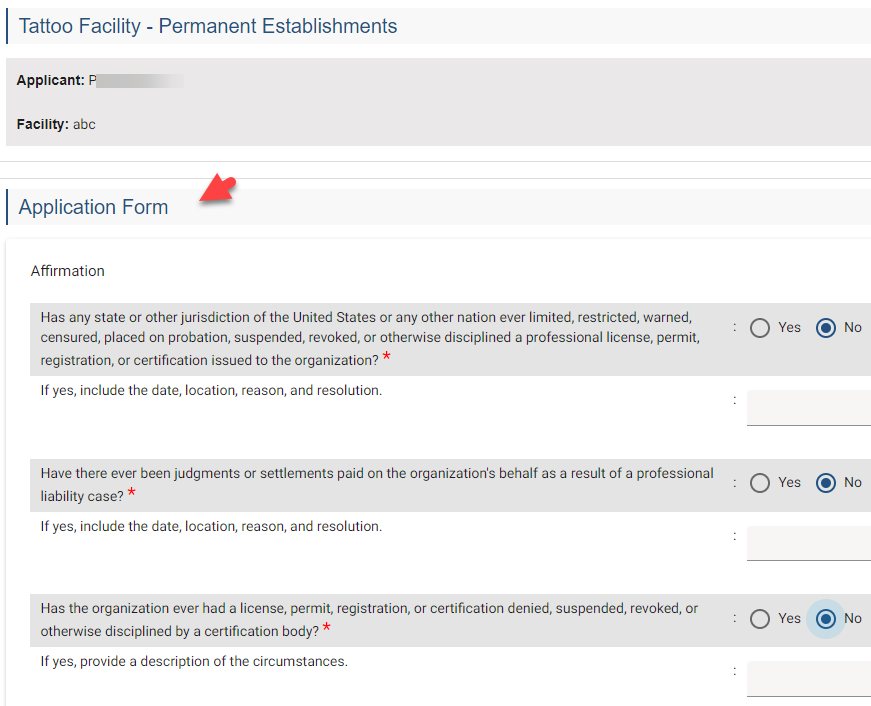
- Answer the questions under Tattoo Establishment Info Details
- Enter your business hours in the freeform text box.
- Answer Yes to the "I have floor plans..." question.
- Enter the county where the establishment is located.

4
Process Free Form Description
- Under the TATF Contact List, click the Add button on the right side of the page.
- You may need to use the scroll bar at the bottom of the TATF Contact List to view and fill out all of the required fields.

- Select the Contact Type from the dropdown.
- At least one owner must be listed for tattoo establishments.
- The person(s) listed as an owner is responsible for the establishment permit.
- Owner responsibilities include keeping the establishment permit current, allowing only permitted artists to practice at the establishment, addressing violations observed during inspections, and maintaining client records.
- Multiple owners can be added to the establishment permit.
- Enter the owner information. The First Name, Last Name, Phone Number, Street Address, City, State, and Zip are required fields
- Click save. Repeat as necessary.
5
Attachments
- Under the Attachments section, click Add New Attachment.

- Use the Attachment Type dropdown to select Floor Plans.
- Add a description.
- Click Choose File to locate your floor plan file and add it to the upload queue.
- If you add an attachment by mistake, you can remove it with the red trash can icon.
- After the files are uploaded, they cannot be removed by the public portal user. Program staff will need to be contacted for any files that need to be removed.
- Click Upload Attachments
- You will repeat this process when uploading documents for any application form Yes answers (if applicable). The attachment type can be "Court Documents" or "Application File."
- Click Continue and then OK on the popup.
6
Public Portal Terms and Conditions
- Check the I agree to the terms and conditions box.

- Click Continue and then OK on the popup.
7
Make a Payment - Tattoo
- You have the option to pay now with a credit card or pay later by mailing in a check or money order.
- Applications are not considered submitted until a payment is made.
- Program staff do not receive a notification for unpaid applications.

Option 1 - Pay Online
- Click Pay Now on the first payment screen.
- On the second payment screen screen, click Pay Now. You will be taken to the Make a Payment screen.
- Please review the contact information. This section automatically populates from your My Profile page.
- Scroll down and select your payment method
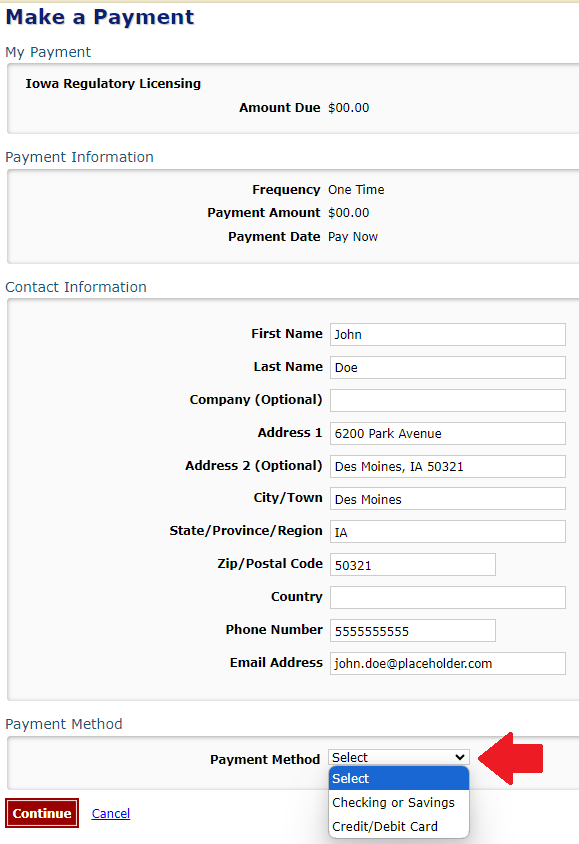
- Enter your payment details for the "Checking or Savings" or "Credit/Debit Card" options.
- It is recommended to pay using a credit or debit card.
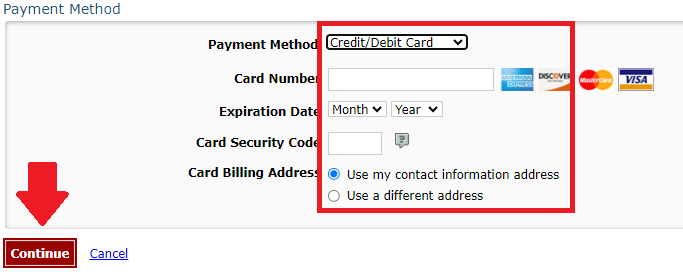
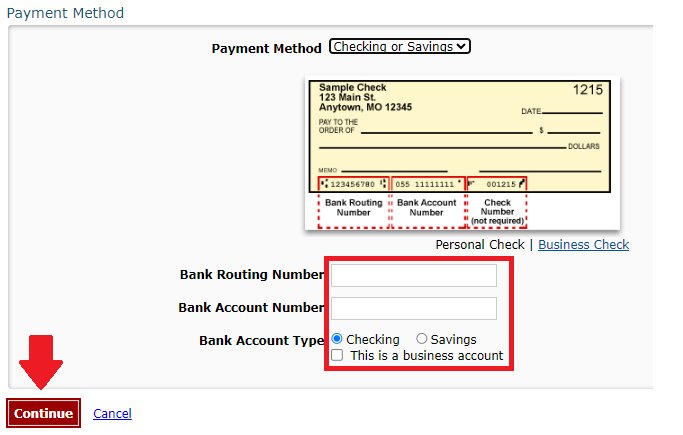
- Click Continue and then confirm the payment.
You will receive an email confirmation of your payment.
Option 2 - Pay Later
- This is used to pay with a mailed-in check or money order.
- Use the Pay Later Options dropdown to select Check.
- You will be taken to the Programs page.
- Click on Details.
- Scroll down to the Payment section and click Print Bill.
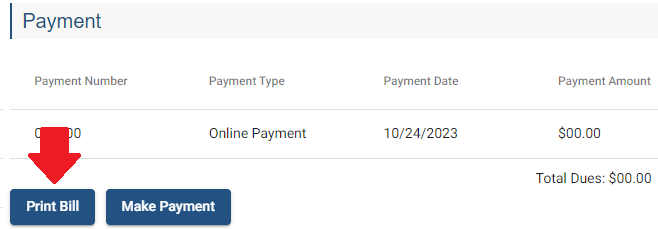
Your bill must be included with a mailed-in check or money order.
Mail your check or money order to:
- DIAL (Iowa Department of Inspections, Appeals, & Licensing)
ATTN: Tattoo Program
6200 Park Ave, Suite 100
Des Moines, Iowa 50321
Cash cannot be accepted.
8
Tattoo Establishment Pre-Opening Inspection Process
- After your payment is processed, your application is considered submitted.
- Please allow two to four weeks for processing. Additional time may be necessary to address application Yes answers or during the tattoo renewal season (Oct. - Nov.)
- Program staff will review your application and attachments.
- Please keep an eye on your email for any program staff follow-up.
- After the floor plan is approved, DIAL program staff contact your local inspection agency. This correspondence is typically handled via email.
- After DIAL staff contact your local inspection agency, your local tattoo inspector will reach out to you and set up a time to conduct a pre-opening inspection.
- After a satisfactory inspection is complete, the inspector notifies the department. The department then processes the establishment permit.
9
Resolving Issues
- The application is not allowing the user to Continue from the Application Form page.
- Verify all required questions are answered.
- Verify you have an Owner saved in the TATF Contact List
- Verify at least one uploaded attachment has the Attachment Type "Floor Plans."
- The application is not allowing the user to continue after agreeing to the public portal terms of service
- Go back to the Application Form page and verify all items in section 1. are satisfied.
- Resuming an in-progress application
- You can close out of the in-progress application at any time and resume it later. Unsaved data will be lost. Clicking the Continue button saves your progress.
- Go to the My Profile page and use the "Select your facility name, organization name, or personal license" dropdown to select your tattoo establishment.
- If this dropdown does not contain your establishment name, register your establishment using the New Company Registration button.
- Do not create a duplicate establishment using the New Company Registration button.
- You will be taken to the "My Licenses, Permits, & Programs" page. Click the Edit button in the same row as the establishment you want to resume.