These instructions assume you have already created an A&A account. To create an account, go to the online licensing portal and click New User Registration.
The online licensing portal displays best on a desktop or laptop computer.
For application support, contact 855.824.4357.
For login or password reset support, visit the Enterprise A&A Account guidance page or contact the help desk at 800.532.1174 or adperehreg@idph.iowa.gov
For general questions about the tattoo program, contact env.health@dia.iowa.gov.
Register the Temporary Establishment
If you already have a permanent establishment or a previous temporary event registered in the online system, you may skip this step and apply for the temporary event under your existing establishment's name.
- Sign in to the online system
- Click New Company Registration to create a new tattoo establishment in the licensing system.
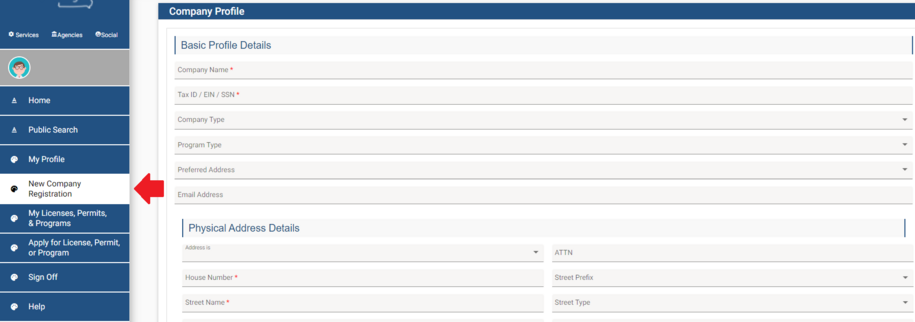
- Enter the establishment information in the required Company Profile fields:
- Complete the basic profile details and physical address details for the company.
- Enter the company name without any extra periods or special characters (apostrophes are okay).
- For company type, firm/entity.
- Under Address select “Work.”
- Enter remaining address details. Fields with a red * are required.
- Unit Type has options for entering: PO BOX, APT, Unit, or Suite.
- At least one phone number is required.
- Click Continue
- Name or physical address changes for a company can only be submitted by emailing env.health@dia.iowa.gov.
Log in and Apply - Temporary Events
- Log into the online system
- Use the Select your facility name, organization name, or personal license" dropdown to select your registered establishment.
- You can use an existing permanent establishment record and apply under that establishment's name.
- You can use an existing temporary establishment record as long as the event names are the same.
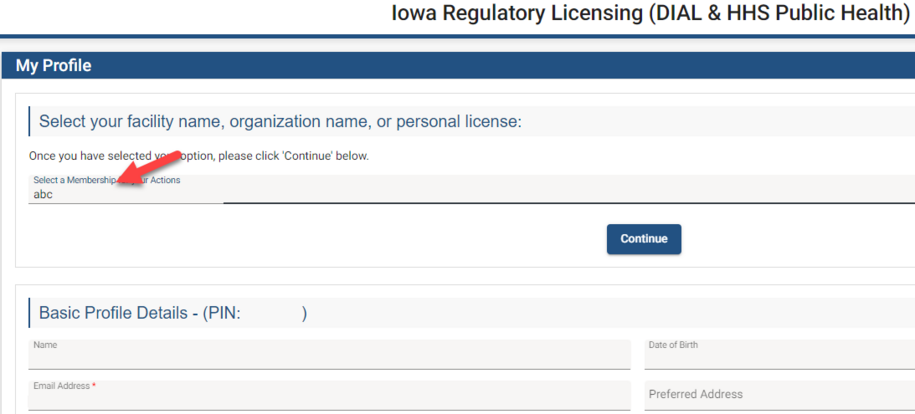
- Click Continue.
- This selects the establishment whose permit you want to apply for.
- Click Apply for License, Permit, or Program in the left menu.
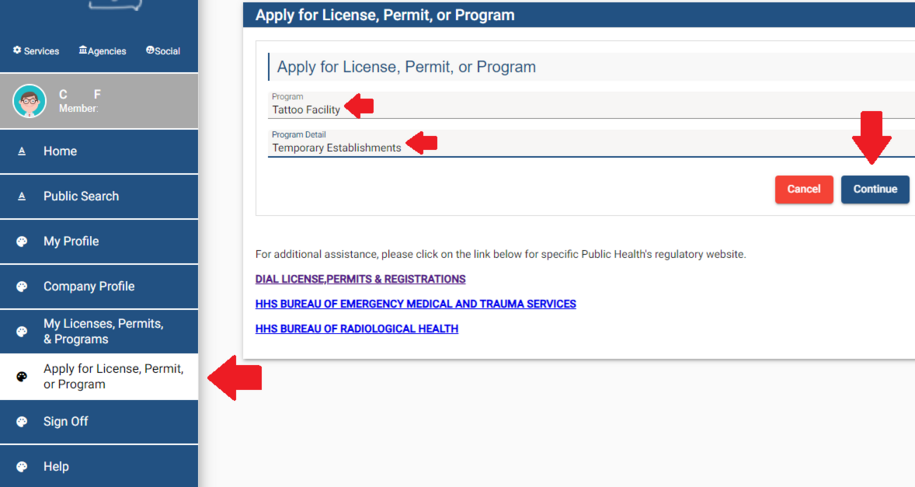
- Under the Program dropdown, select Tattoo Facility.
- Under the Program Detail dropdown, select Temporary Establishments.
- Click Continue.
Application Form - Temporary Establishments
- Answer the questions under the Affirmation section.
- Explain in the freeform text box under any answer with a "Yes."
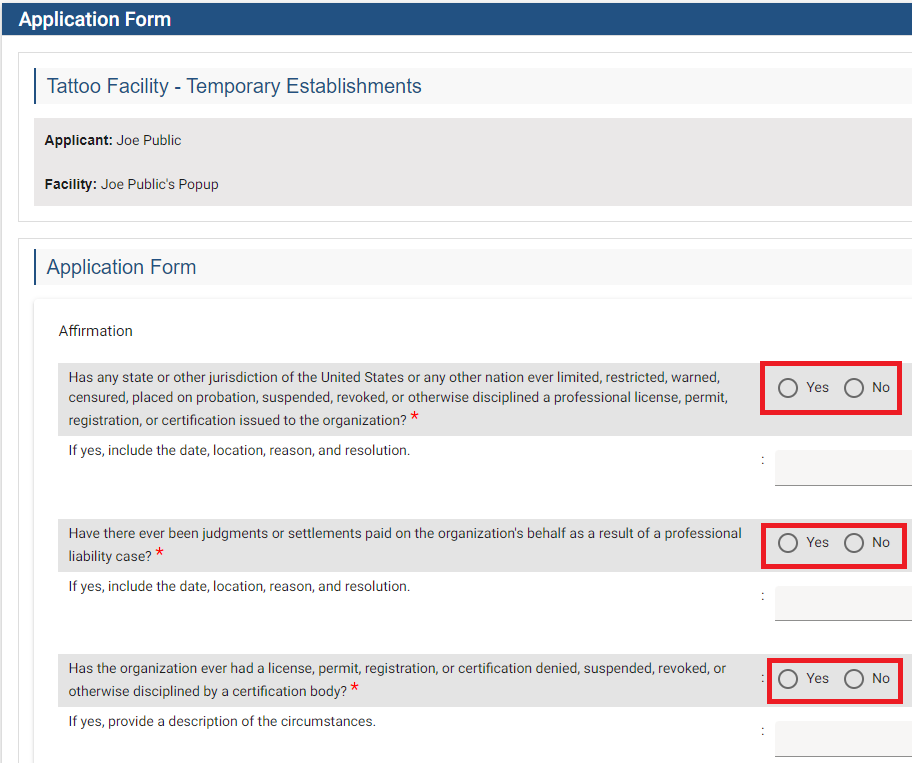
- Under Tattoo Establishment Info Details, answer Yes to "I have promotional Materials and am attaching documentation."
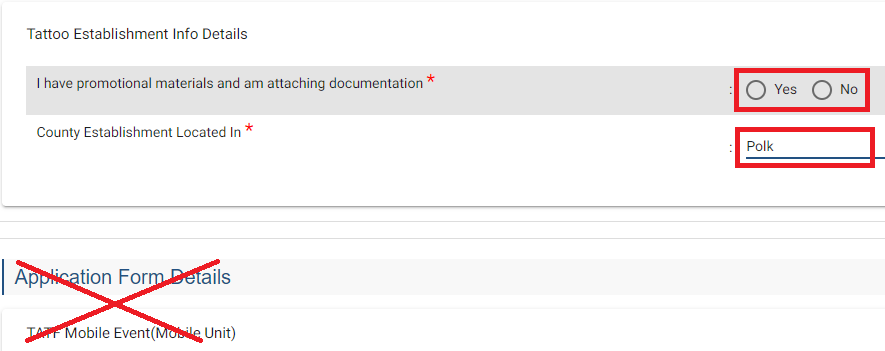
- Use the dropdown to select the county the temporary event building is located in.
- Skip the Application Form Details section.
Attachments - Temporary Establishments
- Click Add New Attachment
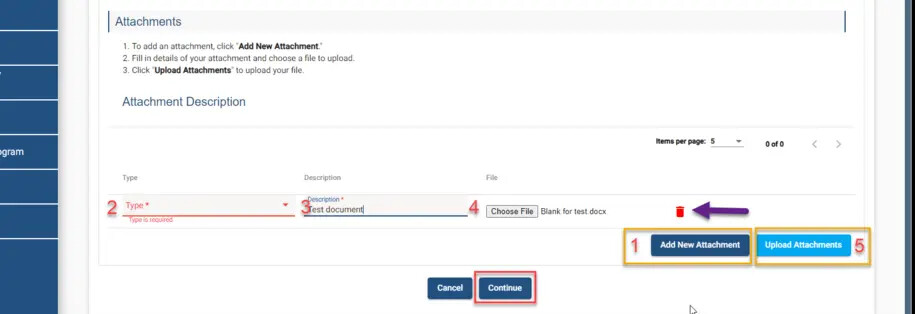
- Use the dropdown to select what type of document you are uploading
- You must select Floor Plans for at least one of your attachments.
- Add a description.
- Click Choose File to locate your attachment and add it to the upload queue.
- Repeat this process until you have uploaded all of your documents.
- Click Continue and then OK.
- If you upload an incorrect document, you can delete it using the red trash can icon.
- After clicking Continue and OK, your attachments are submitted and cannot be removed. Contact the help desk if attachments need to be deleted.
Process Description - Temporary Establishments
- Click the Number of Artists and Booths header to expand this section.
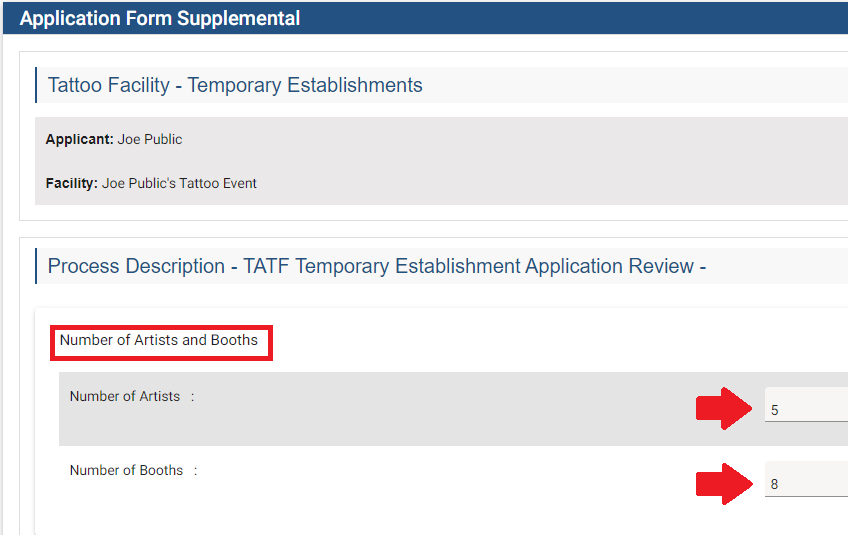
- Enter the number of participating artists and booths.
Process Free Form Description - Temporary Establishments
- Click the Temporary Establishment Event header to expand this section if it is not already expanded.

- Click the Add button to create the event details row.
- Complete all of the required fields for the event details.
- You may need to use the scroll bar to navigate left and right to see all of the required fields.
- Click Save. Do not add any other rows.
- Click the TATF Contact List header to expand that section.
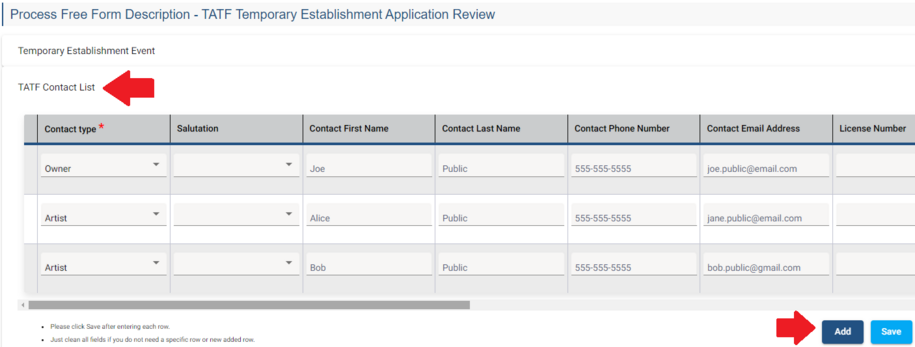
- Click Add to create a new row.
- Use the dropdown in the first column to select the contact type.
- There must be at least 1 person listed as the owner.
- It is okay if this is also a tattoo artist. Include your tattoo artist permit number in the License Number field.
- Enter the information for owner(s) and artist(s)
- Your artist list does not need to be final until 7 days before the temporary event. Program staff will verify your list.
- Adding more artists may require additional application fees to be paid. Please refer to the fee table on the Tattoo Establishments page.
- Add additional rows until all event contacts are added.
- Click Save.
- Skip the Attachments section if you have already uploaded your attachments.
- Click Continue and then OK on the popup.
Terms and Conditions
- Check the I agree with the terms and conditions box.

- Click Continue and then OK on the popup.
Make a Payment - Tattoo
- You have the option to pay now with a credit card or pay later by mailing in a check or money order.
- Applications are not considered submitted until a payment is made.
- Program staff do not receive a notification for unpaid applications.

Option 1 - Pay Online
- Click Pay Now on the first payment screen.
- On the second payment screen screen, click Pay Now. You will be taken to the Make a Payment screen.
- Please review the contact information. This section automatically populates from your My Profile page.
- Scroll down and select your payment method
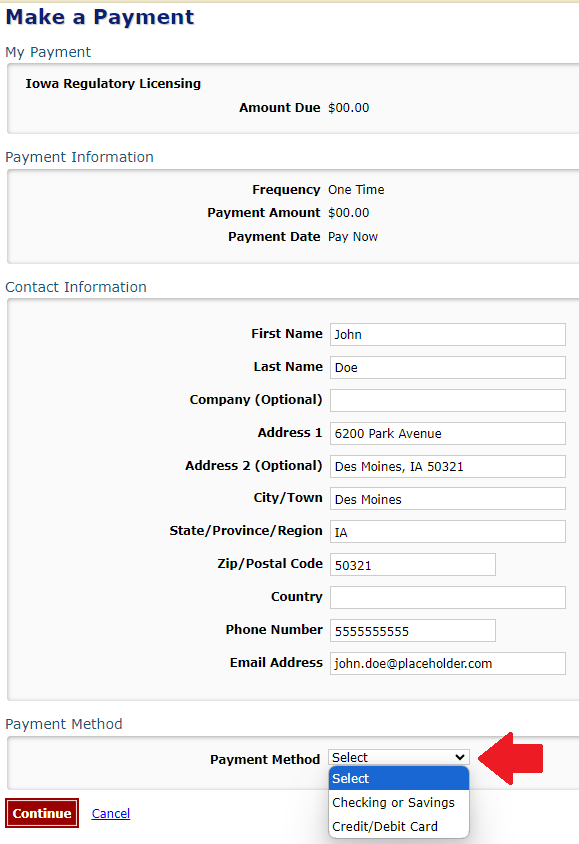
- Enter your payment details for the "Checking or Savings" or "Credit/Debit Card" options.
- It is recommended to pay using a credit or debit card.
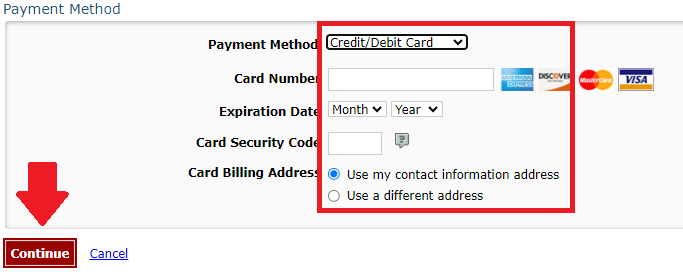
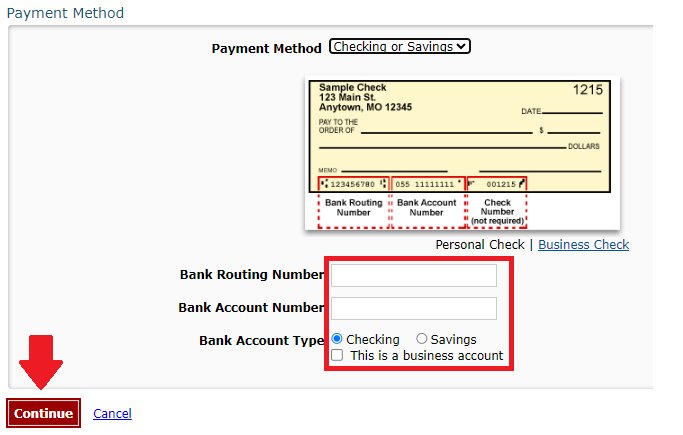
- Click Continue and then confirm the payment.
You will receive an email confirmation of your payment.
Option 2 - Pay Later
- This is used to pay with a mailed-in check or money order.
- Use the Pay Later Options dropdown to select Check.
- You will be taken to the Programs page.
- Click on Details.
- Scroll down to the Payment section and click Print Bill.
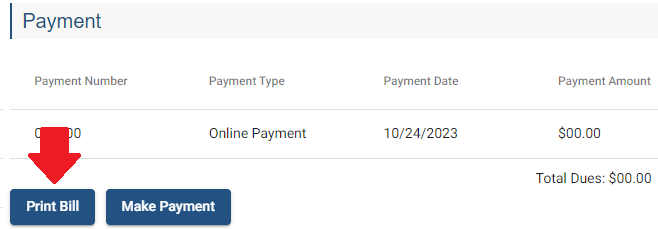
Your bill must be included with a mailed-in check or money order.
Mail your check or money order to:
- DIAL (Iowa Department of Inspections, Appeals, & Licensing)
ATTN: Tattoo Program
6200 Park Ave, Suite 100
Des Moines, Iowa 50321
Cash cannot be accepted.
Returning to an In-Progress Application or Resolving Issues - Temporary Establishments
Returning to an in-progress temporary event application
- Sign into the online licensing system.
- Use the "Select personal license or an organization to proceed" dropdown and the tattoo establishment the event was applied under or the temporary event. Click Continue
- Locate the row containing your in-progress event application and click Edit.
- Continue from the Application Form step.
- Some information may already be saved.
Error - Cannot get past the Application or Terms of Service page
- Ensure all questions and fields under the Affirmation, Tattoo Establishment Info Details, and Tattoo Establishment Info Details are answered.
- Ensure all questions and fields are added and saved under the Process Free Form Description section.
- There must be 1 row created and saved under Temporary Establishment Event.
- There must be at least 1 row created and saved under TATF Contact List.
- Verify you have your attachments uploaded. You must click Upload Attachments in order to save them.
- At least one attachment type must be Floor Plans.
- For additional support, contact the help desk at 855-824-4357 or env.health@dia.iowa.gov.